
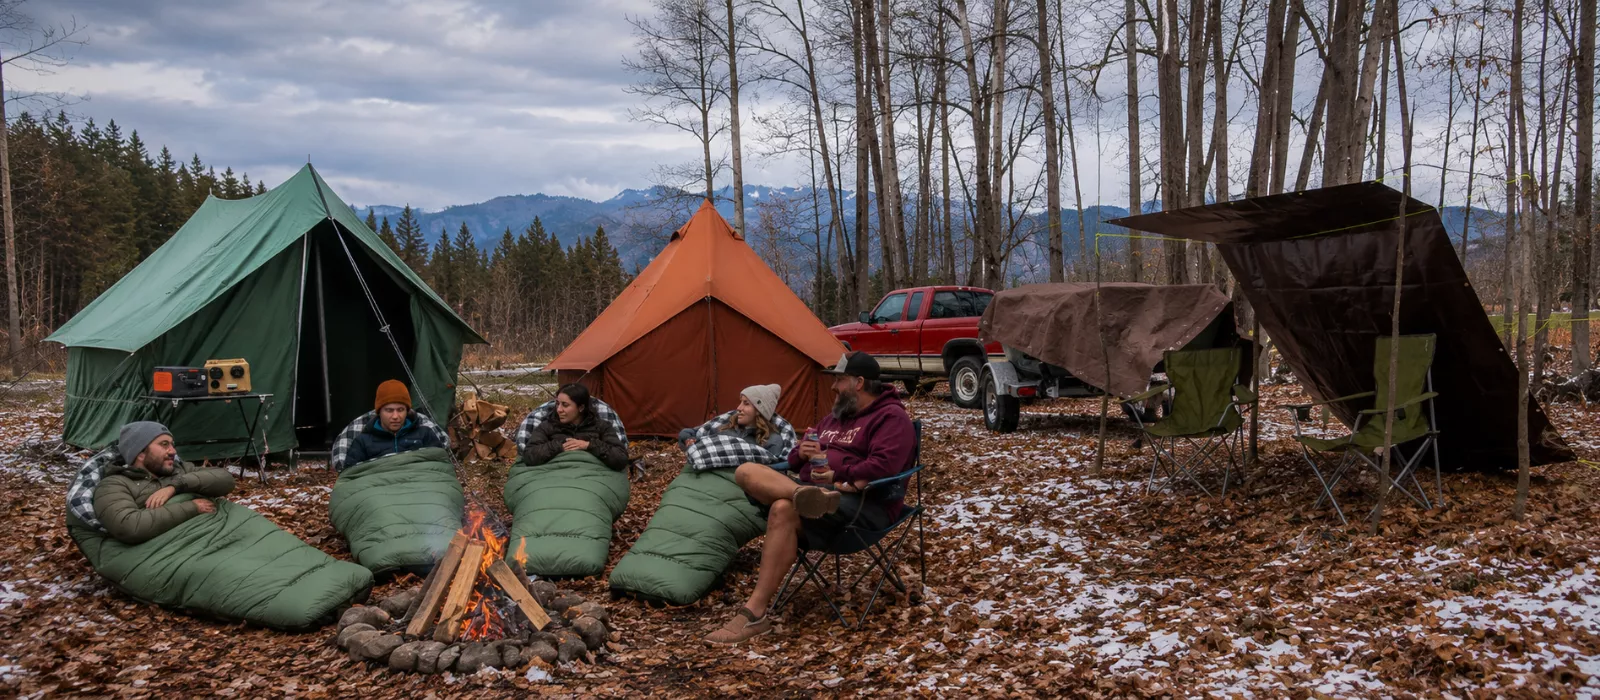
There are certain rites of passage when it comes to camping gear. For many, it was their first mess kit. This is a fold-up set of pans and silverware that often accompanies a certain age in Boy Scouts. There’s your first tent. There’s your first knife. All of these items hold lasting memories and begin to fold into our living memories like a familiar shirt. The careful grip of a hatchet that, for the first time, seems too bulky, or thin, or hooked at its hilt, becomes like a friend after a few uses. When you’re young, getting a new piece of camping equipment is as exciting as Christmas. At times, kids have to wait for the holiday to get new camping gear. The best part about getting new gear is that the feeling never goes away. The anticipation, the furtive imagination that comes with imagining the ways you can use a new backpacking shovel.
Table Of Contents
- Section 1. Spend the Money Here
- The Tent
- The Sleeping Bag
- Rain Gear and Footwear
- Section 2. Find the Middle Ground Here
- The Cooler
- The Camp Stove
- The Camp Furniture
- Section 3. Save Your Money Here
- The Camp Kitchen Smallwares
- The Head Lamps
- The Tarp or Ground Cover
- Spend it, Save it, Just Get Outside.
With $50 to your name when you were just a child, you had to be selective with your purchases. It’s not much different these days. In a single outing, you could spend tens of thousands of dollars and still not have a complete kit. The outdoor industry has capitalized on the idea of making everything seem essential. Down every aisle, there is something every camper can’t live without. Because we all need roughly the same gear but are on different budgets, this guide breaks down the necessities into three categories: where to invest in premium products, the middle ground, and items where budget options are just fine.
Section 1. Spend the Money Here
There are a few items in your kit that should not be compromised on. The initial investment might be a little more up front, but when the weather goes south, the situation is dire, or when the item is still holding up in its tenth season, you’ll be thankful for that initial spend.
The Tent:
This is the most important item in your arsenal. Everything compounds from here. If there is rain and a cheap tent leaks, then it doesn’t matter if you have the best sleeping bag on the market. A wet sleep is always a ruined camping trip. Similarly, if you have a mediocre campsite, exposed and windy, or if there is not much on the landscape in terms of activities, a great tent can save the day. This is where the argument for a canvas tent lives. For the most part, even experienced campers spend most of their time car camping. The option to set off into the backcountry with an extensive hike as an approach to camp really doesn’t occur often. For this reason, everyone should have a canvas tent in their possession.
Tents made from synthetic fabrics have their uses, but they don’t boast the comfort and longevity that a canvas tent provides. These tents are sturdy, rugged, and hold up in the worst conditions. Even so, they still manage to last for decades. These are the tents you can pass down to your grandchildren. While tents made out of polyester have their uses, and it is worth having one of these in your gear, for the weekend warrior or someone who mostly visits their local campsite, the canvas tent is widely preferred.
The Sleeping Bag:
There are a few things to know about a sleeping bag before you make your purchase. There are natural and synthetic fibers, just like tents, but nothing is more important than the temperature rating. This is not a comfort specification; it is a safety specification. A bag rated to 35 degrees, then used in 35-degree temperatures, is going to provide a miserable, cold, and sleepless night. That is because those are survival thresholds, not intended to be the rating for comfortable sleep. For genuine comfort, buy a bag that is at least 15 degrees below the coldest temperature you intend to encounter.
At this tier, quality also matters. Pulled stitching, materials breaking down after frequent use, and cheaper sleeping bags will lose their loft and result in colder sleep. White Duck has a durable and consistently positive rating for comfort and durability. The Slumbernest line ranges from $110-$195, depending on the temperature rating; they hold their loft, and they compress and re-expand cleanly, even after years of regular use.
Rain Gear and Footwear:
These two categories belong together because if you buy the cheap version, the outcome will be the same: a ruined trip.
A cheap rain jacket for $30 or a poncho might last you one rainy day before the DWR (Durable Water Repellent) wears off. At that point, there’s nothing you can do. If it’s a multi-day trip, or if you throw said poncho back in your bag without thinking, you could end up with used rain gear that doesn’t protect and, again, a ruined trip. A quality, breathable rain jacket will run you about $150-$300, but it’s worth it. It will keep you dry and won’t make you sweat. Zippered armpits and other mesh features will keep you moving on rainy hikes without sapping your energy. It really is a worthwhile investment.
They say that shoes make the man (or person), and that might be true. Footwear follows the same logic as rain gear. If you choose shoes that are intended to get wet and drain, then make sure you are swapping socks often. If you are selecting shoes or boots with a Gore-Tex or other waterproof exterior, then remove them frequently after hikes so they can breathe. Taking good care of your feet if outdoors is 101. If you can’t walk, then the trip is lost.
Section 2. Find the Middle Ground Here
For this section, the items here do require some investment, but they are not as necessary as category 1. It’s wise to buy quality here, but you don’t need to break the bank.
The Cooler:
The cooler is the gear item that is solely determined by the length of your trip. For a solo overnighter, a small 4-quart cooler might do. For a family of 5 or 6…you get the picture. If we’re talking about the most practical cooler for the most frequent trips, two- to three-night trips, then a hard-sided cooler in the $80-$120 range is perfect. The premium rotomolded coolers, $250-$400+, that can keep ice solid for 7-10 days are truly exquisite, but, in most instances, unnecessary. They earn that high price tag on the week-long trips deep into the wild where visiting town to re-ice and repack a cooler just isn’t feasible. When you find yourself using the river as a cooler, it might be time to invest in a nicer cooler. Until then, you’ll be fine with a mid-range hard-sided cooler.
The Camp Stove:
For the vast majority of campers, a two-burner propane camp stove handles the cooking demands for the whole camp. With the availability of a fire, enough cooking space is widely available. If numerous groups will be in attendance, different families or friend groups or couples, it would be cheaper to pick up two of these two-burner stoves than it would be to invest in a massive, semi-permanent 4- or 6-burner stove. Many of these can run $500+ and be difficult to haul. Similarly, a single backpacking burner weighing mere ounces has different uses as well. While these stoves can range upwards of $300, they serve a specific purpose. The aforementioned 2-burners usually run around $60-$100, and the design has really been perfected over the years. A simple but durable design that works every time.
The Camp Furniture:
Go into your local outdoor store and then take a walk through the closest box store. Give the camping chairs the Pepsi challenge. For most folks, saving the extra $30-$40/chair is more worth it than a swinging chair, or a built-in footrest, or some extravagant soft cooler in the arm. The added features are nice to talk about, but rarely get used with any consistency. The quality of the higher-priced chair is also not vastly better. You’ll probably end up buying a new chair after one or two seasons.
There are some caveats in this category, of course. For older folks, those with injuries, back issues, breastfeeding mothers, or other particular differences, going for a camper-specific chair is always a good idea. In these instances, clearly label who gets the nice chair, and keep it separate and always available for the honored sitter.
Section 3. Save Your Money Here
For these items, they are really nice-to-haves. In some instances, you could even do without some of them, or what you have lying around the house can be a nice accommodation. It should be mentioned that this category does not suggest that the higher-priced items found here are not worth their ticket value; it’s simply to imply that if there are some major savings to be had, here is a good place to do it.
The Camp Kitchen Smallwares:
This isn’t a wedding. Folks are RSVPing to your event with a plus-one. The napkins do not accent the relief in the bone china. There is no need to purchase matching silverware and cooking utensils. There are shelves of decent pans, utensils, and cooking wares in secondhand stores that will still get some miles out of them. There are a few things to keep in mind. BPA-free plastics are always recommended, and try to avoid nonstick pans with Teflon as well. Teflon will degrade at higher heats, and there’s nowhere for that substance to go except into your food.
The Head Lamps:
There are some truly remarkable headlamps out there that will stay lit for days, work in nearly any temperature, and light the way for the whole journey across Antarctica. But, similar to the coolers above, that really isn’t necessary. There are headlamps on the racks at gas stations that, in a pinch, will provide adequate light for a weekend trip. Now, this is not what you should be relying on each time you set out camping, but there is an honest money-saving answer here. A $30-$40 lamp from a reputable brand will last years and keep you camp well-lit. Check out the Black Diamond Spot or Petzl Tikinna in this price range.
The Tarp or Ground Cover:
This is a difficult one, but some distinctions should be made. If you are using your tarp for shelter, or you are using it as a footprint under your tent, you should invest in a higher-priced, high-quality canvas tarp. Likewise, a good canvas tarp is ideal if you are going to be setting up on the forest floor or in a meadow and want a comfortable place to sit. For skin-to-skin, it’s a canvas tarp all the way.
If you simply need something to block the sun, or throw over your gear at night or during travel, a cheaper tarp for $40-$60 will be just fine, and you won’t grow any emotional attachment to it at that point. Besides the canvas tarps, there are ultralight tarps that, on the other end of the spectrum, can cost upwards of $150, but these are designed for specific use cases and are really only necessary there.
Spend it, Save it, Just Get Outside.
Looking at these different categories, you can really set up a camping budget based on your needs, desires, and comfort level. The idea here is that with just a few simple items, you can have a solid camping setup for under $1,500 and still have a little something left over for gas to get you to a National Park 3 states away. What’s important is that the time you’re experiencing while outdoors isn’t hindered by your gear. A breakdown in gear means a breakdown of the trip, and no one will remember the gear failing as much as they did that camping wasn’t fun. To build generational interest in camping and respect for our wild spaces, it takes a little research and investment. This guide should help get you there.





No Comment! Be the first one.