
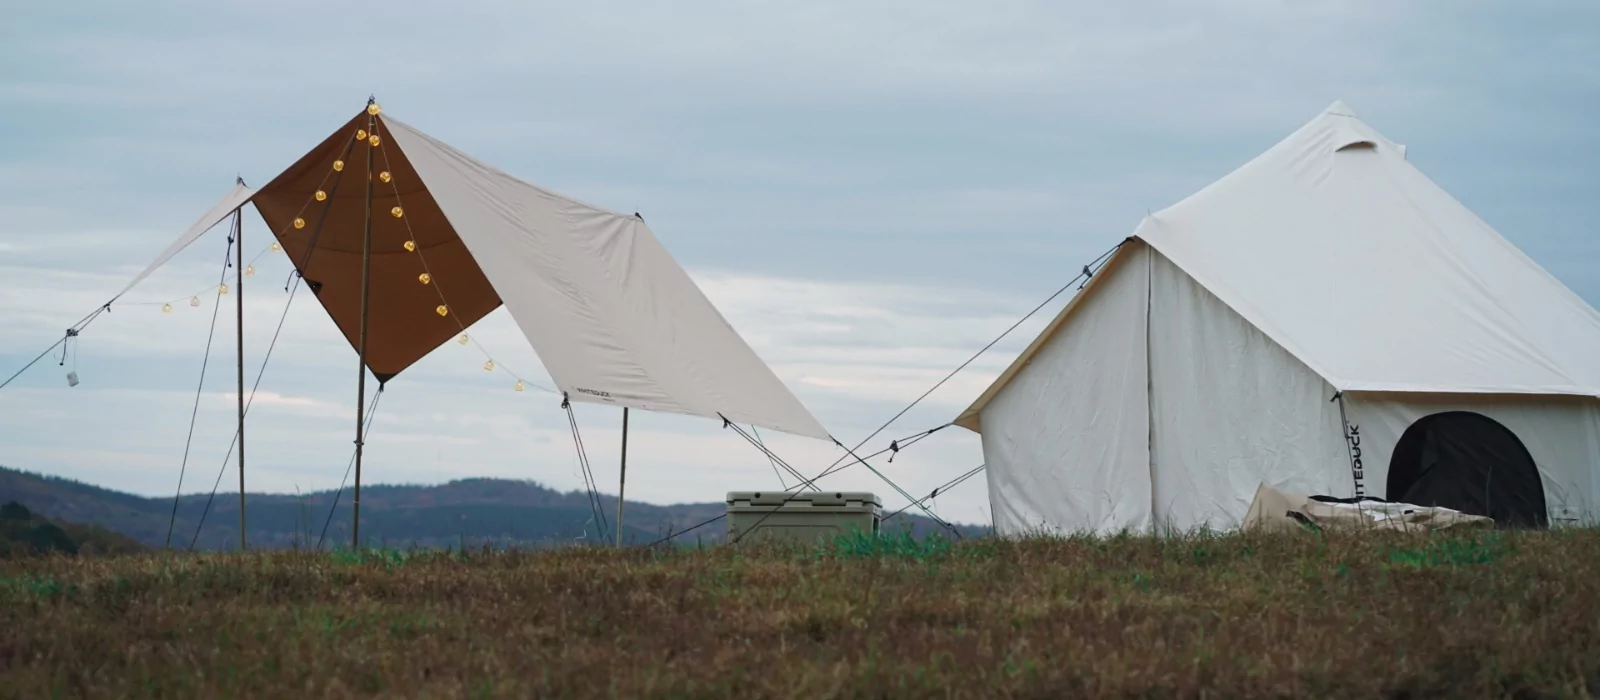
When making plans for your next camping trip, you’re probably thinking about where you’ll go, what temperature-appropriate clothing to pack, the type of tent you’ll take along, where you’ll sleep, meal plans, how you’ll get there, who you’ll invite, even the rain forecast. But did you consider means of extra protection from the harsh sun? Are you thinking about camping shade solutions? Probably not! We’re here to tell you, though, that having ample shade is a game changer for comfort and safety regardless of the season you’re camping in. Here are a few ways to create a little DIY camping shade without breaking the bank or using up valuable space with tons of extra gear.
Table Of Contents
- Tree-Tarp Shade Method
- Items You’ll Need
- How-To:
- PVC Pipe Canopy
- You Will Need
- To Do
- Mylar Blanket Shade
- You’ll Need
- Assembly Instructions
- DIY Tent Awning Shade
- What You’ll Need
- Get Going
- DIY Sail Shade
- Materials Needed
- How-To
- Instant DIY Shade: Beach Umbrella
- Items You’ll Need
- What to Do
- DIY Personal Parasol
- You’ll Need
- How-To
- Conclusion
Tree-Tarp Shade Method
The most approachable and effective way to create extra shade at your campsite is to use a simple tarp. You likely already have a canvas tarp or plastic tarp on hand. Tarps are extremely versatile and can be used in so many different ways. Here’s how you can manipulate the (ideally 10×12) tarps you already own to function as a DIY shade:
Items You’ll Need:
- Large tarp
- Durable rope
- Tent poles – optional, but helpful if you have extras lying around.
- Carabiners
- Tent stakes
How-To:
- Choose a flat location near where you have pitched your tent and set up camp. Make sure the area is clear of overhanging tree branches.
- Stretch the tarp between two tall trees or tent poles and secure the top half of the tarp in this position.
- Use your ropes and stakes to secure the bottom corners of the tarp to the ground, creating a slant in the tarp’s angle if you need to.
- Adjust according to the height you need/the sun’s changing position throughout the day.
PVC Pipe Canopy
Again, using your chosen tarp or fly sheet, you can create a strong and structured DIY shade system. A PVC pipe canopy can be easily disassembled when the camping trip is over, leaving no trace behind! Not to mention PVC pipes are super inexpensive. Win.
You Will Need:
- ¾ inch diameter PVC pipes
- PVC elbow & knee joints
- PVC pipe cutter (do this part at home before your trip)
- Poly or canvas tarp
- Paracord/bungee cords
- Tent stakes
To Do:
- First, before you head out to the woods (so you don’t have to lug your PVC pipe cutter with you or risk injury in the middle of nowhere), use the pipe cutter to make four vertical poles and four horizontal connectors. You’ll need 6-8 connecting pieces to make the rectangular canopy, cut smaller. Visualize a height of 6-8 feet for the finished product–a box shape, tall enough to stand up in.
- When you arrive at camp, use PVC elbow and knee joints to connect your pieces to make that 6-8-foot tall rectangle the frame of your canopy.
- When you arrive at camp, use PVC elbow and knee joints to connect the pieces and create a 6- to 8-foot-tall rectangle that will serve as the frame of your canopy.
- Finally, stake down any overhang and secure your PVC frame so that the canopy doesn’t get blown over.
Think beach canopy tent, but homemade! This PVC pipe canopy is a great DIY shade cover that can be customized for privacy or extra spaciousness. Essentially, you’re building a portable gazebo for your campsite.
Mylar Blanket Shade
If you’re looking for low-effort, high-efficiency– DIY mylar blanket shades are your friend. Mylar reflects sunlight rather than absorbing it like most other materials, so you’re sure to stay cool when sitting under one of these bad boys.
You’ll Need:
- 5×7 foot (at least) Mylar blanket
- Tent poles or sturdy trees for anchoring
- Ropes or paracord
- Tent stakes (or heavy rocks)
Assembly Instructions:
- Locate the sturdy trees or tent poles to which you’ll tie the Mylar blanket.
- Attach one edge of the blanket to the tree or pole anchor points using ropes or paracord and stretch it tight over the area you’re trying to shade–reflective side out.
- Use the tent stakes or heavy rocks to secure the loose side to the ground. Angle the blanket according to the sun’s rotation.
DIY Tent Awning Shade
One of the best, most efficient ways of enhancing your camping tent and providing extra shade at your campsite is by adding a tent awning. Here are a few simple, cheap DIY ways to add an awning to your arsenal of tent accessories and provide maximum shade to your camp.
What You’ll Need:
- Large tarp, either canvas or plastic will work
- Tent poles/trekking poles or nearby trees
- Strong ropes
- Tent stakes
Get Going:
- First, choose your sturdy anchor points, whether they are sturdy poles or strong trees at a reasonable distance from your tent.
- Tie your tarp firmly onto the anchor points using rope or paracord. Make sure it creates a slanted canopy from the front or side of your tent. Angle it so that the awning not only provides shade but also encourages rainwater to run off rather than pooling on top of the tarp.
- Use your tent stakes to secure any hanging edges or corners of the tarp to the ground. This helps keep the tarp taut and firm against wind and other movement.
- Adjust the height and tension of the tarp awning as the sun moves to create maximum shade coverage.
DIY Sail Shade
Breathable and aesthetically pleasing, a DIY sail is an easy way to create a ton of extra shade coverage at your campsite. Because the sail is not going to be tied down tightly on all sides, it’s still moveable, allowing the breeze to pass through while keeping you shielded from direct sunlight. Talk about maximum cool factor.
Materials Needed:
- Large sheet of UV-resistant fabric or canvas tarp
- Ropes
- Tent poles or nearby trees
- Tent stakes
How-To:
- If necessary, cut your sheet of fabric down to the size you need. If working with a large canvas tarp, no need to do this. It’s best to choose a fabric with some UV resistance so the material will last you several seasons without breaking down.
- Use the rope to secure the top side of the fabric to tree branches or poles–if using poles, arrange them so that they are fastened perpendicular to one another. You’ll want one for sail height and one for width.
- Drape the fabric loosely to create a triangular shape.
- If it’s a particularly windy day, use a tent stake or two to fasten the bottom of the fabric loosely to the ground to keep your shade in place.
Sail shades are an awesome choice for those concerned with aesthetics or looking for a breathable, easily customizable shade solution. They’re also relatively effortless to construct and cost-efficient.
Instant DIY Shade: Beach Umbrella
An obvious choice for good reason, a large beach umbrella is an easy, quick, cheap option for campsite shade. Using a beach umbrella is a great choice for folks hiking into their campsite, and wanting to keep the pack light. Beach umbrellas are easy to move and adjust with the sun’s movement in areas with few trees around for shade.
Items You’ll Need:
- Large outdoor umbrella
- Umbrella stand or heavy rock to weigh it down
- Auger
- Tent stakes for added stability – optional
What to Do:
- Use the auger to dig a deep hole for the base of the umbrella pole to sit sturdily. Sometimes, umbrellas have weighted bases but if it does not, use a heavy rock or cooler to help prop the umbrella up.
- Now, open the umbrella and adjust the angle to face the sun. You can always change the height and tilt of the umbrella with the day.
- If it’s particularly windy, tie the umbrella down with stakes and ropes for extra stability.
DIY Personal Parasol
Now that we’ve covered some options for general campsite shading, let’s talk about one of my favorite individual shade methods—one you can use alongside any of the ideas above. A DIY parasol gives you control over your own shade and moves with you as you explore the campground and surrounding areas. Note: This is one you’ll want to make at home before heading to camp.
You’ll Need:
- Umbrella frame repurposed from an old or broken umbrella
- UV-resistant fabric like canvas or polyester (any cotton fabric you have on hand works too)
- Thread, needles, sewing machine
- Sharp fabric scissors
How-To:
- Remove the fabric from your old, tattered umbrella. (Alternatively, you can purchase a cheap one and use it as the base)
- Measure the diameter of your umbrella base and cut more than enough fabric to cover it. Leave some hanging over the edges of your frame.
- Use your sewing machine or carefully hand-sew the fabric onto the frame, cinching it every few inches. Start at the top and work your way down. It should be secured firmly and evenly across the frame’s ribs.
- Test out your cover! Open and close the umbrella, making sure your parasol covering fits.
A parasol is ideal for personal shade as opposed to a regular umbrella because they are typically made of breathable, cooling fabric. Parasols are lightweight, and you can tote your DIY personal shade parasol with you wherever you go!
Conclusion
Having plenty of shade at camp is such a level-up for comfort and functionality. By using items you probably already have on hand, or can purchase without breaking the bank, you can make major improvements to your campsite based on your preferences and local weather conditions. Next time you head out to enjoy the great outdoors, do it without a sunburn! Happy camping.





I go camping in the desert each year and our entire shade structure got blown apart last year! Going to try the first bc even if it does blow apart, at least the materials are cheaper 🤪