
Anyone who has spent time in the backcountry knows the value of staying up a little too late and walking away from camp almost too far. Looking into the night sky, as the stars separate from the ink-black sky, the most brilliant orbs glow in the dark. Reaching into your pocket, you grab your phone and click. A black screen. Nothing. No brilliant, starlit sky. Just a fuzzy screen indiscernible from a powerless brick.
Table Of Contents
This isn’t the biggest deal in the world, but it is frustrating. Of course, we all want to be in the wild and live in the moment, separated from our technology, in order to feel the transcendence of the moment. But sometimes it’s nice to take some of the memories with us, to share with friends and family, and to record the brilliance of nature in its honest form. To do so, we’re going to take a look at how to photograph the Milky Way while camping.
If this scene has ever happened to you, don’t despair. No one was ever born knowing what f/2.8 means. This post is for campers who want to elevate their photo skills, not for photographers who happen to camp. These are camping astrophotography tips for beginners, not studio work. The environment is always the point. The camera is just how you hold onto it.
Do You Need a DSLR to Shoot the Milky Way While Camping?
This is a fair question, and there are thousands of opinions on the matter, ranging from personal blogs to those of Ansel Adams enthusiasts. The truth is no, but when it comes to the camera, there are some non-negotiables:
- Smart Phone Camera: Modern flagship phones like the iPhone 15 Pro or newer and the Pixel 8 Pro can capture the night sky in night mode with a stable tripod. This is a great starting point.
- Mirrorless / DSLR: Significantly better low-light performance than just a nice phone. A used entry-level body from Nikon, a Canon Rebel, or the Sony A6000 line can run from around $300-$400, and this is more than enough to get started.
- The camera is nice, the prop is better: A solid tripod with a wide-angled lens (24mm or wider), a remote shutter or two-second timer delay is necessary to eliminate shake at the moment of exposure.
Thousands of pseudo-photographers and influencers will tell you you need more than this. If you’re out to shoot the night sky, this is really the best place to start. The most important thing to accomplish is to get somewhere with a night sky. Here is a link to some of the best and darkest locations in the US to shoot the Milky Way while camping.
If some of the language above is already sounding intimidating (what is a DSLR?), don’t worry. We’re going to go over the basics in the next section. Then we’ll get into some clever techniques like using your tent to get the perfect shot.
The Three Settings That Control Everything
The first acronym that will come and go 1,000 times, and you still might not know exactly what it means, is SLR or DSLR. If your parents ever had an old aluminum-bodied camera bouncing around the house (likely the Canon AE-1), there is a high probability it was a Single-Lens Reflex (SLR) camera. This is a system that uses a mirror to reflect the image to the person shooting the camera. When you throw a D on the front of that acronym, it becomes a Digital Single-lens Reflex camera. The principle is the same, but now the shutter is activated digitally. For most folks out there, we’ll just assume you’re shooting on a DSLR, but in all honesty, the same settings and controls apply.
These are the three dials that you’ll need to know to take the best Milky Way photographs while camping.
Aperture (f-stop): This is how open the lens is. The smaller the number, the more open the lens will be, which means the more light will be let in. For photographing at night, you need to have the lens nearly all the way open. So crank it down to f/1.8, f/2, or f/2.8. You want maximum light hitting the sensor, and this is the single biggest lever you have.
ISO: This measures the image sensor’s sensitivity. The higher the ISO, the more light sensitivity, which results in a grainier photo. For nighttime photos, stick to the 1600-3200 range. Find what your camera can handle before noise gets ugly.
Shutter Speed: This is exactly what it sounds like. The shutter on the camera opens for a brief moment and lets in the desired amount of light to capture the image on the sensor (or film). To shoot the Milky Way, obey the 500 Rule: Divide 500 by your focal length to get the maximum exposure time before the stars start trailing into streaks. At 24mm, it would be: 500 / 24 = ~20 seconds. Shooting longer than that, and the Earth’s rotation shows up in the frame.
Focus: Manual only. Always. Auto-focus won’t find anything in the dark. It will churn and churn until your battery runs dead. Set the focus to infinity and then back off gradually. Use the live view zoomed in on the brightest star you can find to confirm sharpness.
These four settings are the foundations for how to photograph the Milky Way while camping. Everything else is refinement.
The Tent is Part of the Composition
There are thousands of camping astrophotography tips and techniques to heed while in the wild at night. Find some of your favorite blogs and photographers and point out what you like best about them. Save those ideas and practice, practice, practice. One trick that is easy to use while you’re refining your skills is light painting. This is the act of using light in creative ways within the frame of the shot to brighten up certain sections while still being able to catch the night’s sky. Stating it is very easy, but pulling it off takes a little practice and the right tent.
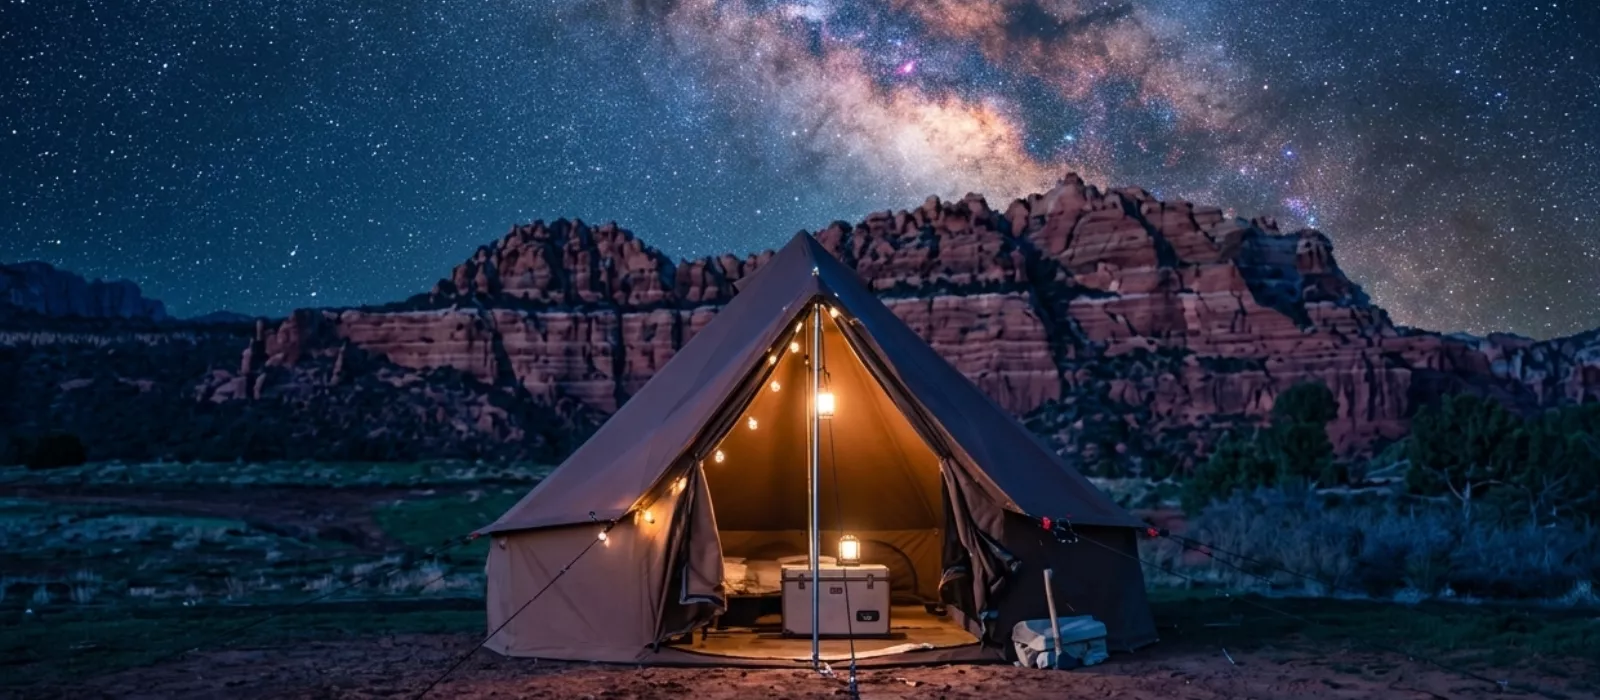
A classic look in the outdoors during the jet black pre-dawn is a luminous tent featured among the trees with the brilliant spread of the Milky Way overhead. To get this image, you’ll want a tent that can diffuse light cleanly. Many synthetic tents can’t do this well, while canvas tents are ideal. A well-built bell tent or canvas wall tent looks stunning in the wild when they are glowing under a starlit sky. The dense weave in the fabric creates an even, warm diffusion rather than harsh blowout or patchy hot spots through the seams, which can happen with nylon tents.
Beyond the attractive aesthetics, canvas tents block ambient interior light more effectively, which will matter when multiple people are camping and in proximity to one another. This diffusion is made possible with someone inside the tent holding a steady light, which will make this effect, and you’ll get a photo that looks fit for a magazine cover.
Some Beginner Mistakes (we’ve all made them)
There is no shame in learning by messing everything up. Look at it this way, at least you’re not burning up film every time you click the shutter. We’re fortunate enough to live in the digital age, and the only thing the mess-ups are costing you is your precious time. Luckily, you can be out there with friends and loved ones keeping you company. Here are some things to keep in mind so that the learning curve gets a little steeper:
- Using white light after dark: This can kill night vision for 20-30 minutes and will blow out anybody’s nearby exposure. As soon as the sun goes down, it’s red light only.
- Not waiting for your eyes to adjust: Take your time under the night sky. The stars that appear in the first 5 minutes after the sun is totally gone are much different from those that appear 30 minutes later. Be patient.
- Shooting during the wrong moon phase: While the full moon is amazing and a fun subject to shoot on any given night, if you’ve planned to head out to the wilderness to shoot the Milky Way, make sure you’re on a new moon cycle to achieve the darkest skies possible.
- Skipping the foreground: A frame full of sky with no earthbound reference point is technically a photo of space, not a photo of your campsite under the Milky Way. That’s fine, but grounding the sky in a camping photo will ensure the memories are gathered.
- Stopping after one shot: Conditions shift. Things change. ISO that is spot on at 11:00 pm might need to be adjusted by 1:00 am as the core rises higher. Make sure to bracket everything.
- Expecting the phone to be the same as a DSLR: Most of the viral Milky Way photos you’re seeing in the wild, or the ones your friends are posting, are composites or heavily processed. If that’s your aim, then learn Lightroom.
These are just a few camping astrophotography tips to keep in your hat when you’re headed to a dark skies campout. By the time you take a couple of these trips and go through a few dozen bad shots, you’ll have these practices down like they were second nature.
Dark Sky Etiquette: The Unwritten Rules of Shooting at Camp
Anytime we step foot into wild spaces, we need to be good stewards of the people around us and the practices the camp has endorsed. If you are alone on BLM land in the middle of nowhere, your practice is up to you. But if you’ve chosen a dark sky camp, then there are most definitely people there who have come to photograph the starry night. Keep a few things in mind if you’re out there as a beginner.
We are too attached to our phones, but no one minds. Not until you swing a bright white light around when someone has an open exposure. Leave your phone in your pocket. This also applies to the campfire. If people have come to shoot, or if you are shooting yourself, let the fire die down when it gets later. Keeping a rager going while others are waiting for the light to die down is pretty tacky.
Light painting your canvas tent is awesome, but make sure there isn’t someone nearby who has an open exposure. Work with the people around you, make friends, and follow clear etiquette with the group that will keep everyone shooting and no one missing any shots. On that note, this is a shared activity. If someone is out there asking you what settings you’re using, just tell them. If you got those recommendations here, they’re not yours anyway. Make a friend.
Even if you’re a solo adventurer and like to keep to yourself, the rules of practicing with a group still apply. Be thoughtful of other people’s practices and expect the same of your time. It’s a big sky out there. There’s enough room for everyone.





No Comment! Be the first one.